Craft Projects to Get Kids Pumped for Halloween (Without the Sugar High)
We've compiled our favorite Halloween kids' projects for you and your little goblins.
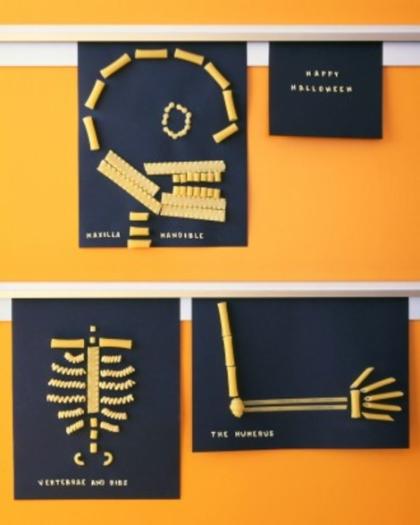
Pasta Skeletons
Kids can bone up on anatomy and create a fun Halloween decoration at the same time when they make a skeleton out of noodles. With an illustration of a skeleton as a guide, they just need lots of dried pasta, white glue, and construction paper to assemble the pictures. We snapped some of the pasta in half and used alphabet-soup noodles to make labels.

Pumpkin Seed Necklace
What to do with leftover pumpkin seeds? String them into a pretty necklace.
Materials
Pumpkin
String
Cookie sheet
1. Scoop out a pumpkin and place the seeds and pulp in a bowl of water. The seeds will quickly separate from the fibers and float to the top.
2. Remove seeds and rinse them, then place them, in a single layer, on a paper towel or cookie sheet.
3. Let dry at room temperature 6 to 8 hours. Do not let seeds dry too long before stringing them, as they will become brittle and hard to work with. Thread a sewing needle with silk beading cord, and pierce seeds, stringing them in the patterns shown at top (tie knots in between for spaces) or your own. Knot cord.
Related: Martha Stewart's Favorite Outdoor Halloween Decoration Ideas (52 of Them!)

Glittered Pumpkins
These decorations bring sparkle to tables and serving areas -- and they last far longer than jack-o'-lanterns.
Materials
Small pumpkins
Medium-sized paintbrush
Glitter
White glue
Paper plate or newspaper
Brown acrylic paint
1. With paintbrush, spread layer of white glue over the surface of a small pumpkin. Place pumpkin on a paper plate or newspaper to catch excess glitter.
2. Sprinkle powder glitter over glue, covering completely. Let dry for an hour, then shake off excess powder.
3. Coat stem with brown acrylic paint, let dry. Once dry, the stem can also be covered in brown glitter if desired. The pumpkins will keep for months.

Talking Pumpkin
Eeek -- it's alive! Make a jack-o'-lantern talk using an old baby monitor. Place the parents' unit inside the pumpkin. Kids can hide, then speak into the transmitter whenever trick-or-treaters come near. We cut up a synthetic carvable pumpkin, but this project works just as well with the real kind.
Talking-Pumpkin Tips
Carve synthetic pumpkins with the same tools you would use to carve a real pumpkin. Instead of cutting a lid, make an opening in the bottom big enough for the monitor. To make sure that no one sees the unit, use pushpins to tack a piece of black fabric or paper behind the pumpkin face.
Related: 20 Super-Efficient, Super-Effective Ways to Clean All the Things

Pumpkin Favor Pouches
For party favors or treats on Halloween night, fill crepe-paper pumpkin pouches with tiny toys and candy eggs.

Homespun Pumpkin Decorations
Assembled from yarn, rope, and foam balls, these homespun pumpkin decorations are simple to make. For each, gently press top and bottom of a Styrofoam ball against a work surface to flatten ends (so ball doesn't roll). Wrap orange roving around ball. Insert a T pin into top. Tie cream or orange mohair yarn to pin and cover ball. Cut a length of rope; place over pin, and help kids attach with a hot-glue gun, pressing to secure.

Halloween Hang-Ups
Floating, spinning, spooky visages are fun to make and decorate.
Pumpkin template
Owl template
Cat template
8 1/2-by-11-inch sheets of colored paper
Glue stick
Hot glue gun
Hole punch
Ribbon
1. For each decoration, you'll need to accordion-fold 8 1/2-by-11-inch sheets of colored paper, making 1/2- or 3/4-inch folds. For small faces, accordion-fold 3 sheets of paper vertically, then bend each in half to make a fan. For medium, accordion-fold 6 sheets horizontally. For large, accordion-fold 11 sheets vertically.
2. For small faces, cut 6 strips of paper equal to length of fan's fold and twice its width; fold in half lengthwise. Use a glue stick to attach strips to fans, and fans to one another, forming a circle. For larger faces, glue 1 edge of folded paper to next until you form a circle. Hot-glue center to secure.
3. Print templates (pumpkin, cat, and owl, above), enlarging or reducing to desired size. Trace shapes onto colored paper twice; cut out. Attach shapes to each side of decoration with hot glue. Hole-punch top; hang using ribbon.
More from Martha Stewart Living:
15 Kitchen Shortcuts That Will Change the Way You Cook
19 Tips for Perfect Laundry Every Time
Instant Organization: Get It Together in 15 Minutes or Less
47 Ways to Maximize Space in Your Kitchen
