How to Grow Your Groceries: The Rookie Guide to Farming at Home
First off, let's dispense with the myth of the "green thumb," and shed concerns that growing food requires lots of free time and special skillz. Sure, there are people who have keener instincts for plants than others, but really anyone, anywhere can grow their own food - even Amanda, who works full-time, has two small kids, and can barely keep a fern alive. Only three weeks ago, Amanda planted a vegetable garden following Jeanne's crazy-simple growing guidelines.
Jeanne isn't a by-the-book type, she's a get-down-in-the-dirt-and-learn-by-doing type, and after 26 years of experience growing food in hundreds of farms and food gardens, she's boiled down the magic and mystery of edible gardening to the barest essentials. We'll roll out our Rookie Guide in three posts-this one on planning your food garden, then planting, then tending-with five simple steps to success in each. The guidelines will apply whether you're growing on a rooftop, in the ground or in containers or pots. Without further day, here's everything you need to know about planning your food garden. Once you get these key principles right, the planting and tending is shockingly simple and fun.
Related: 15 things every gardener should own
1. Sunlight
Most fruits and vegetables require loads of sun, so pick a spot for your garden that gets at least 6-8 hours of sun per day (you can measure the amount of sun you get with an affordable device like a "Suncalc" ). If your location has limited sun (5-6 hours), choose crops that can tolerate less sun, like leafy greens, cucumbers, beans and herbs. If you don't have a sunny yard, you can plant in containers on a sunny deck, balcony, rooftop or fire escape; if you don't have any of those, plant with a neighbor or on a community plot or in a schoolyard.
2. Soil
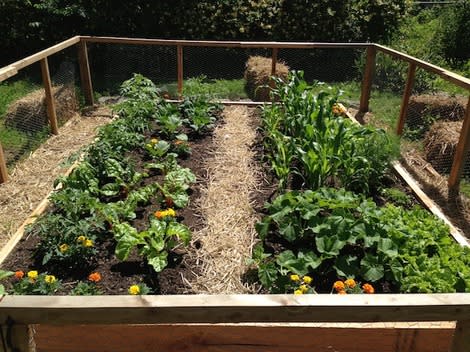
Healthy soil is the immune system of your garden: if a plant is well nourished by good soil, it's less likely to be eaten by insects because pests attack weak plants first. You ideally want to plant in 12 or more inches of well-aerated, nutrient-dense soil blended with compost. Use a generous amount of compost-- you can't really use too much. (Jeanne usually applies a three-to-six-inch layer of compost when preparing her garden beds, and works that into the soil.) For an extra nutrient boost, you can also blend in some organic granulated fertilizer to your soil mix before you plant. (We love Happy Frog) If you're growing in the ground near an old house or in the city, test your soil for lead or other toxins. Amanda's soil was lead-laced, so she worked the Nashville-based garden care company Weeding Woman which trucked in a rich soil-compost blend from a local nursery to fill the raised bed (pictured above).
3. Paths
Paths are more than just cosmetic - without them, the soil in a garden can get compacted, which makes it hard for roots to spread and chokes off the oxygen that's essential to soil health and plant growth. Be sure to clearly demarcate the paths around your rows with straw, woodchips, stone, or whatever else looks good to you. If the row of soil where you plant your crops has paths on both sides, it should be no wider than four feet so that plants can be reached and tended from both sides. If a row can be reached from only one side, make it roughly 2 feet wide.
3. Fencing
Rabbit-proof fencing should be roughly 3 feet high and several inches below ground; the holes in the mesh should be no bigger than 1" x 2". Deer-proof fencing can range from 5 to 8 feet high depending on the size of deer population and the amount of open space around the garden (the more space the deer have to run and jump, the higher the fence should be). Amanda's fence, pictured above, cost $250 to build using recycled cedar boards, chicken wire, and a staple gun; other more ornate iron and wooden garden fences can cost many times that. Some homeowners like to investing in high-end fencing because the fence is the part of the garden that you look at all year long, whether or not it's growing season.
4. Irrigation
We love hand-watering with our kids - it's a fun ritual every evening before dinner. But if you only have an hour a week to spend in your garden, use that time to tend your plants and install a watering system on an automatic timer before you plant. (There are affordable timers with sensors that measure soil moisture} and then prompt your system to irrigate as needed.) Jeanne loves drip-line tubing because it delivers water to plants at their roots. An ordinary sprinkler connected to your garden hose can work as well, particularly when attached to an automatic timer. (Be sure to time the sprinkler to irrigate in the early morning or evening so that wet plants are not scorched by midday sun.) Dripworks.com is a great resource for information, equipment and other resources.
In part two of our Rookie Guide to Growing, we'll give you more details on supplies, what to plant when, and much else. In the meantime, get some paper and start sketching plans for your garden using the guidelines above!
-By Jeanne Nolan and Amanda Little
For 10 righteous reasons you should grow your own food, visit Babble!
MORE ON BABBLE
10 ways to cure common ailments without calling your doctor
The 25 greenest homes in the world
8 incredibly easy crops to plant in your vegetable garden
