Kentucky Couture: Derby-Inspired Hats and Headpieces
Put your hats on and pinkies up for our favorite excuse to drink mint juleps at noon. Whether you're off to the races or holding court from your back porch, be the favorite when it comes to Derby style with these creative hat and headpiece projects
Related: 13 Crazy Beauty Tricks That Really Work
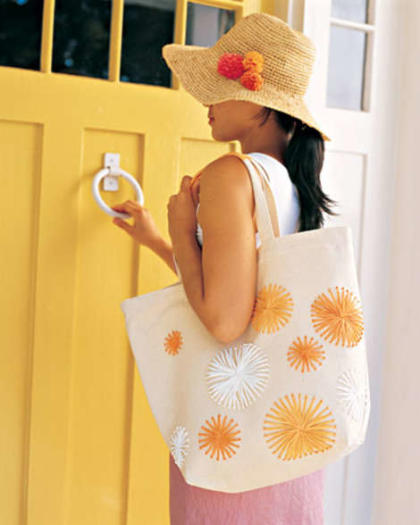
Straw into Gold: Raffia Tote Bag and Hat
Punch up a plain straw hat with homemade raffia pom-poms, dyed to match your most genteel party attire.
Materials
Canvas tote
Raffia
Disappearing-ink fabric pen
Large-eyed needle
Pom-pom maker
Floral wire
Pliers
Straw hat
1. Start with a canvas tote and raffia in 3 shades. Using a disappearing-ink fabric pen, draw circles on tote, 1 for each sunburst (ours are 1 1/2 to 5 inches in diameter).
2. Mark the center point of a circle (A) and 1 point anywhere along the circle's edge (B). Thread a large-eyed needle with raffia in desired color, knotting it before embroidering design using a French-knots-on-stalks stitch.

3.
Draw needle up through A. Wrap raffia around needle 3 times. Holding wrapped portion together, gently draw needle down through B, forming French knot.
4. Repeat step 3, always coming up through A but moving B 1/4 inch over, until the sunburst is complete.
5. Make matching pom-poms to trim a straw hat. Using a pom-pom maker and raffia, make a pom-pom (ours are 1 1/2 inches in diameter).
6. Wrap center with floral wire, twisting wire with pliers to secure. Trim wire to 1/2-inch. Repeat to make more pom-poms, using raffia in different colors.
7. Then attach to hat with embroidery thread.
Related: 35 Pantry Staples for Healthy Eating

Louisville Luster: Spray-Painted Tassel
Swap predictable florals for a funky metallic finish. Keep things subtle with just a sparkly tassel, or use our technique to make your entire hat shine.
Working outside to avoid breathing in fumes, quickly and evenly spray items you wish to spray-paint with silver paint, and let it dry for a few hours. Get our how-to for tassels below.
Materials
Heavy card stock, cardboard, or foam board
Silver raffia
Silver thread
1. Cut a board from card stock (ours was 4 inches wide); the board should be double the length of the desired tassel. Wind raffia tightly around board 14 times or until you reach desired fullness (tassel will be twice as full as the loop around board).
2. Lay a 10-inch length of thread horizontally on work surface. Slide wound raffia off board, and center it on thread. Tie thread into a tight knot around middle of looped raffia.
3. Pull ends of the 10-inch thread upward and the wound raffia downward. Cut through looped ends to create fringe; adjust into tassel shape.
4. Cut a 12-inch length of thread to wrap tassel neck: Fashion 1 end of thread into a loop, then lay loop on tassel. Grasp the other end, and wrap it tightly around tassel and over the top of the loop to secure it. Wrap slowly, working from the top of the neck down, so neck threads lie evenly next to one another.
5. After wrapping neck, pass end of thread through loop and gently pull loop closed, tucking ends into the head of the tassel. Trim tassel ends. Use the tie-off threads on top of the tassel to attach it to your project.
Related: 25 New Ways to Eat Avocados

Sharp Chapeaus: Party Hats
They may not be the wide-brimmed style favored by Southern belles, but these DIY party hats pack some serious style. Let guests decorate their own for a Derby-chic crafternoon.
Materials
Decorative paper
Colored vellum
Sheets of double-sided adhesive
Pencil
9- or 10-inch plate
Scissors
White glue
1/2-inch-wide grosgrain ribbon
1. Start by backing two 10-inch squares (9-inch for kids' hats) of decorative paper with colored vellum: Attach vellum to paper with a sheet of double-sided adhesive. (For the hats shown here, we used one piece of patterned paper and one piece of solid color paper for each hat.) Trace the outline of a 10-inch (or 9-inch) plate onto each square, and cut out the circles.
2. Lay the patterned circle on top of the plain one, overlapping by about one-third the circles' diameter; attach with white glue. Once the glue has dried, cut slits for the ribbon ties: At seven o'clock on the left circle and five o'clock on the right, cut two parallel 1/2-inch slits, 1/4 inch apart and about 1/2 inch in from the edge. Thread each side with a 12-inch length of 1/2-inch-wide grosgrain ribbon. The ribbon should come out through the inner slit and go back in through the outer slit, leaving a 1/2-inch overhang on the inside of the hat. Glue overhang to the hat's inner surface.
3. While the glue dries, make the tassel: Cut out a 9-by-5-inch rectangle of vellum. Place it on your work surface with a short side facing you. From the top left corner, measure 2 inches to the right, and mark. Cut in a diagonal line from this point to the bottom left corner; you should have a piece that measures 9 inches long, 3 inches wide at the top, and 5 inches wide at the bottom, with one right angle at the right side of the base. Along the diagonal edge, cut into the vellum at 3/8-inch intervals, stopping about 1 inch short of the straight edge. Place a pencil at the bottom (wider) edge, and roll the strip tightly around the pencil. Carefully curl each segment of the tassel with scissors.
4. Glue the curled tassel into the upper v-shaped indentation between the two circles, and let the glue dry. Bring the other edges of the circles together to overlap by one-third their diameter, and glue them together. Press together until glue is dry.
Related: 47 Ways to Maximize Space in Your Kitchen

Thorough-Head: Paillette Flower Headband
This sparkling hairpiece would steal the show at any debutante ball. Get in on the fun -- sans all the fuss.
Materials
Metal or plastic headband
Length of sequin trim in approximately the same width as the headband
527 Multi-Use Glue or similar adhesive
Paillette flower
1. Cut sequin trim to the same length as the headband.
2. Apply glue to headband; center sequins on headband, and press into place.
3. Glue paillette flower where you desire.

Triple Crown: DIY Flower Crown
Take an earthy approach with a flower crown that's made for roaming the meadows -- or nibbling canapes.
Materials
Silk flowers, panysilk.com
Floral wire
Floral tape
Scissors
1. Start with a yard of cloth-wrapped floral wire, and create a loop at one end.
2. Gather two or three fake buds at a time. Clip off stems, then secure heads (and the occasional leaf) to the wire with floral tape. Nestle everything closely, and vary the color and size of the blooms.
3. Continue until you have your desired length. Make another loop, and cut the wire.
4. Weave a ribbon through both loops. Your crown is done-and adjustable!

Run for the Roses: Tulip and Rose Flower Costumes
Prefer a tongue-in-cheek approach? These rose and tulip toppers make a very literal garden-party statement.
Materials
Scissors
Pen
Craft glue
22-gauge floral wire
Wire cutters
Floral tape
Brown-paper-wrapped 18-gauge floral wire
2 plain headbands
6 1/2-inch pail with handle
Double-sided tape
Crepe paper in the following colors and quantities: 2 sheets salmon (for tulip cap and pail), 2 sheets green (for leaves and calyxes), and 1 sheet pale pink (for rose headband).
Petal template for tulip and rose, plus calyx template for tulip headdress, rose, and pail
1. Photocopy petal, calyx, and leaf templates; cut out. Trace the petal template onto salmon crepe paper; cut out 9 petals (make sure the paper's grain runs vertically).
2. To shape petals, hold at the widest part; gently pull edges while pressing with thumbs to make a cupped shape. Curl the top left and right corners around a pen.
3. Trace the leaf templates onto green crepe paper; cut out 1 large and 3 small leaves for each sprig. Run a thin line of craft glue down center of each leaf; place an 8-inch piece of 22-gauge floral wire on top of glue. Fold leaf in half to cover wire; let dry. Gently unfold.
4. Wrap wire with floral tape, starting at the base of the leaf.
5. To make a sprig, bind 2 or 3 leaves together with floral tape. Trim 2 pieces of brown-paper-wrapped floral wire to 14 inches each. Twist wires together to form tulip stem, leaving 5 1/2 inches on each side untwisted at bottom. Bend untwisted segments apart to form an arc around top of headband; secure to headband with floral tape. Attach one petal to stem with floral tape, about 2 inches above headband. Stagger remaining petals, leaving an opening in front for face. Accordion-fold one piece of green crepe paper into 4 sections; trace the calyx template. Cut out calyx shape, leaving edges attached as shown; unfold. Wrap the calyx around the base of the tulip; scrunch and tape to stem on top of petals. Curl ends upward around a pen. Starting at top of flower, wrap stem in floral tape, taping one or two sprigs of leaves to stem. Bend stem slightly downward.
6. Photocopy petal, calyx, and leaf templates. Trace the petal template onto pale pink crepe paper; cut out 9 petals, then shape and curl. Attach first petal to brown-paper-wrapped floral wire, wrapping base of petal around wire to form a curled rose-petal shape. Continue taping petals to wire, layering around the stem.
7. Accordion-fold a 6-inch piece of green crepe paper into 4 sections; trace the calyx template. Cut out calyx shape, leaving edges attached where shown; unfold. Tape calyx to base of rose. Curl calyx ends downward around a pen. Wrap stem with floral tape. Bend rose along arc of headband, positioning bloom just past center. Trim wire stem at tip of headband. Secure rose to headband with floral tape, adding leaves and sprigs (as described in step 5).
8. Photocopy petal, calyx, and leaf templates; trim off bottom edge of petal template where indicated. Trace the petal template onto salmon crepe paper; cut out 9 petals (if using a different size pail, cut additional or fewer petals). Shape and curl petals. Wrap pail handle with floral tape.
9. Run one piece of double-sided tape around the outside of pail a few inches from the top edge and one piece along the bottom edge, then affix one piece to the bottom of each petal. Press each petal to the bottom piece of tape, then to the top piece, to secure, working around pail and overlapping as you go. Tuck the edge of the last petal underneath the first.
10. Accordion-fold a 19 1/2-inch piece of green crepe paper into 13 sections (if using a larger pail, add extra inches and additional sections); trace the calyx template. Cut out calyx shape, leaving edges attached as shown; unfold. Secure to base of pail with double-sided tape. Curl edges downward around a pen. Make leaves and sprigs (as described in step 4), and attach to handle.
More from Martha Stewart:
19 Tips for Perfect Laundry Every Time
8 Surprising Ways to Tame Your Sweet Tooth
Watch for More: