The Ice Cube Method... And 7 More Things You Need to Know About Making Baby Food
My son Hayden is the third baby I've made homemade baby food for.
By now, even 5 years span between children, I have the routine down pat and could do it with my eyes closed. That statement is not intended as a boast or brag, but to let you know just how simple it can be to prepare your baby's food at home. Many, including myself, feed baby food right out of the jar, and that's great! But if you ever had any desire to make your own food or questions on what to do, or were simply just curious about the process, I thought I'd share with you how I go about making my homemade baby food. The routine, is simple enough, and when done in large batches, needs to only be done every few weeks. Here's how I tackle the job of making homemade baby food.
1. Make It In Batches
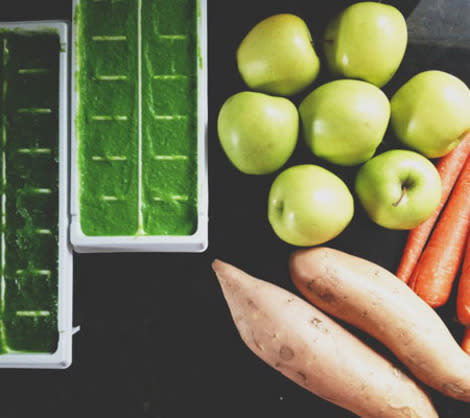
First thing's first, and that is to plan to make several different kinds of purees at once, as I truly find that it is so much easier to spend a couple of hours making several batches every few weeks, then to make a batch here and there every few days. This day I made carrots, peas, green beans, sweet potatoes, pears and apples, enough to last at least 3-4 weeks.
2. Prep All At Once
Many of the foods require peeling of the skins, so I do all my prep work in advance and just add foods to the pile, instead of washing, peeling, cutting, cooking and pureeing one by one. This way I can get my peeling done, then throw the peeler in the wash, chop, then wash cutting board and knife, and so on. It makes clean up much easier.
Related: How I introduced my baby to solid foods

3. Cooking It Up - Do What Works For You!
Once all your prep work is complete, start cooking. Now everyone will have a different opinion and method of cooking so do what you think is best and works for you. I microwave all my foods in a bit of water, but some people prefer to steam or even roast over microwaving. For me, microwaving makes the whole process more manageable, and even if a bit more nutrients are lost, they're still chock full of goodness.
4. Time To Puree
After my first batch is done cooking, I put another batch to cook and in the mean time I start pureeing that first set of cooked food. I've ever only used my blender with excellent results, so don't feel like you need a fancy baby food making machine or even a food processor. I add the cooking liquid to the food with additional water if need be to get a nice pureed consistency. Between each batch I just do a quick rinse of the blender and start again!
Note: Not All Purees Are The Same
You'll notice that your purees will all have a different texture and consistency and that's okay, you just mainly want them all to be nice and smooth. Sweet potatoes always seem to be thicker than carrots for instance, which hold a ton of water. I just add water, breast milk or even formula to the food when serving if it needs to be watered down a bit. You'll know that if baby gags a bit then it's probably too thick.
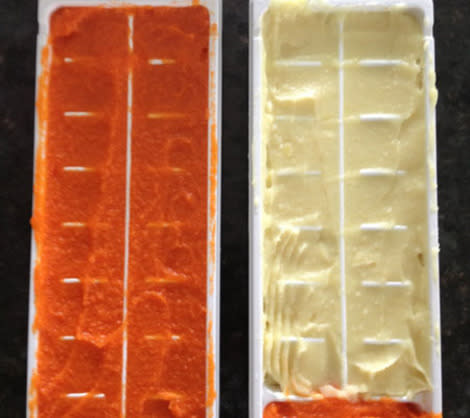
5. The Ice Cube Method
I have always used the ice cube method to store my baby food. Each cube filled to the top should weigh exactly 1 oz. making it super easy to figure out portions when feeding baby. Just place your purees in the trays and freeze for a few hours. Currently at 6 months and 17+ pounds I feed Hayden just 1 cube 2-3 times a day, with a bit of baby cereal. As he gets older he'll eat as many as 4 cubes of food per sitting if he is anything like my other two!
6. Frozen Solid
Once frozen, twist a bit to loosen up the cubes and place them in a freezer bag for storage. You may need to run a little bit of water over the back of the trays to help them loosen up a bit.
7. Storing Baby Food
As I said, I store in freezer bags and label the date I made the cubes as well as the contents. While it's safe to store baby food for up to 3-6 months, I usually go through them much quicker than that so I never have to worry about the food losing nutrients. When Hayden is done with purees and onto finger foods, if I have any left over I'll add to his pastas or rice or whatever type of food I can mix it into.
8. When It's Time to Eat
You're probably asking yourself how I actually feed the food to him once it's frozen? Easy! I just take a cube out, pop it in a microwave safe bowl and heat up for 30-45 seconds and then serve. I may be biased, but I really think he loves my homemade stuff the most
So If I'm spending 3+ hours making baby food, how do I squeeze it in? Well I usually start as soon as I get the kids off to school in the morning and have Hayden hang out with me in the kitchen. Then he can see me, I can talk to him and hand him toys and such. Once he starts getting fussy, I put him down for his nap and then finish up. I'll admit that I find it's easiest to just focus on the baby food making and not try to multitask though.
- By Andrea Howe
Follow Andrea on Disney Baby
For 3 more things to know about making your own baby food, visit Disney Baby!
MORE ON DISNEY BABY
19 make-ahead meals for busy parents
10 power foods to keep you energized throughout the day
5 "new mom" things I swore I'd never do
10 encouraging quotes every mom should read
