Recycled plastic bag pompom flowers

We survived our spring garden cleaning spree and have been enjoying the benefits of a nice green yard and some happily sprouting veggies. Amazingly, the wee tot has really gotten into gardening and actually has been listening when asked to stop pulling the plants out, but instead to put them back IN the ground. So, now she happily digs up the few plants in her little garden and then re-plants them.
Hey, it keeps her busy.
A few flowers are starting to raise their heads to the sun and the temps are steady in the upper 70's and low 80's making me feel more like summer than spring. But, our indoors reek of winter. There are big blankets everywhere, a fireplace that needs cleaning, and some dowdy place mats and dishes hanging about. The real issue is the wee tot's room. Now that she's progressing from baby to toddler, it was time to up-date her room with some summer style.
Those flowers were my inspiration for my complete Internet search, looking for some fun ideas and crafty mama-sence for some instant summer decorations. Well, once again the Motherboard had some suggestions to help me get motivated and accomplish my mission. Their flower lamp-shade embellishments reminded me of some super cool tissue pompoms, which looked just like big happy dahlias.Why not make some tissue paper flowers to hang from the wee tot's ceiling above her crib - along with a few created from recycled materials!
Don't freak out - this project is way easier than you'd think, and the kids can get into it, too. And, you know how much I love re-using those plastic bags hanging out under the sink! These recycled plastic pompom flowers are awesome and so cute!
How to make them
Start by stacking six plastic bags on top of each other with the handles on one end and the bottoms on the other.
Now use a sharp scissors to cut off the bottom seam of the bags along with the top handles from the bags.
Use the scissors to cut the sides of the bags on both sides, leaving you with 12 rectangles of happy white plastic bag stacked and ready to go.

Now accordion fold the plastic bags starting at one of the short sides of the bags - but really, it doesn't matter if you fold from the long side or the shorter side of the bags. We created great plastic pompoms either way!

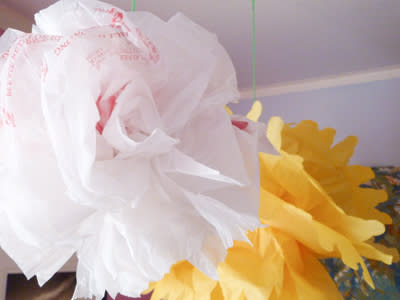
Cut a length of string and tie a knot around the middle of the folded plastic bags, leaving some remaining string to use for hanging. We had some green string hanging around, which was perfect for making these poofy plastic bag pompom flowers.

Here's the fun part! Start opening the layers by pulling apart the plastic bags. Before you know it, you'll have a beautiful flower!

Want to make one with tissue paper? Follow the same directions, but with sheets of tissue. We experimented with smaller pieces of tissue paper, just a few stacked together, and cutting the outside edges of the tissue paper, all with great results!
I hung our finished creations from the ceiling of our daughter's room - and we ALL love them!

*If you wanted to really summer-up these flower pompoms, you could use thick green ribbon to hang them, making them look like fresh flowers floating from your ceiling!
**And, yes, that is my daughter slumbering happily under the finished product!
