JELL-O Marshmallow Crispy Lemon Pie
No-bake desserts are where it's at, especially as the weather turns warmer and I can't bear the thought of heating up my kitchen with baking. JELL-O marshmallow crispy lemon pie appealed to me as a laid-back baker, a mom with kids and a husband to please and feed, and simply because the recipe looked easy enough. Would it live up to expectation?
Indeed. This simple dessert was ideal for one of the first warm days of the season.
Getting started
The ingredients were simple to grab from my local grocery store, and I already had a few in the fridge or pantry. You'll need 1.5 TBSP of butter, 4 cups of mini marshmallows, ½ a package of lemon JELL-O, 1 package of lemon JELL-O instant pudding, 3 cups of crispy rice cereal, 1.5 cups of milk, and sliced, fresh strawberries or raspberries for garnish. I spent less than $10 on these ingredients, and there were leftovers, too!
Helping around the kitchen
Because there was no baking, no cutting, and measuring didn't need to be precise, it was the perfect dessert for my daughters to help with. They watched with excitement while I melted the butter in the microwave and were thrilled to dump in half the package of lemon gelatin themselves. After stirring, we added the marshmallows to our microwaveable bowl one cup at a time. The girls had a hard time mixing the marshmallows and gelatin/butter mixture-they wanted it to mix well and completely. Instead, the marshmallows only get coated by the butter/gelatin. The girls were excited to see what happened when we stuck the mixture back in the microwave until it was melted. What fun!
Pouring and spreading
Once the marshmallows have melted, it's time to mix them with the three cups of crispy rice cereal. My daughters loved pouring the mixture over the cereal. Take your time and mix the two together, then pour them into a well-greased pie plate. I was worried about making sure the crust was well defined, but all that really matters is that the middle of the pie plate is slightly lower than the edges. This was the only part of the process that was frustrating for my daughters, who didn't like the mixture sticking to the spoon or their fingers.
After the pie crust is completed, mix the pudding as directed. Then, pour it into the crust and refrigerate for 2 hours.
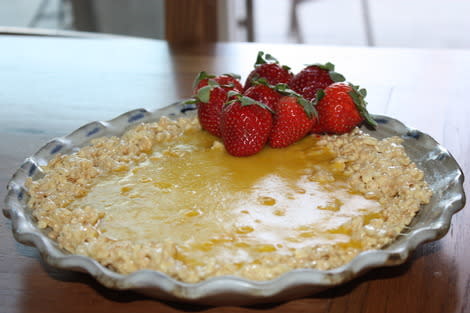
Finishing touches
When you're ready to serve, add sliced fresh strawberries or raspberries as a garnish for your no-bake dessert pie. They add a little something extra to this zesty, seasonal dessert! Slice and serve to your party guests (or, in my case, the children following you around and asking if it's ready yet).
Content by Kelly Herdrich.
