Pumpkin Carving 101
Craft impressive Halloween jack-o'-lanterns with our easy design, carving, and cleanup tips
by Kendra Vizcaino-Lico, Epicurious; photos by Sara Bonisteel

With Halloween just around the corner, it's time to start thinking about costumes, candy, party favors, and, of course, pumpkins. Carving jack-o'-lanterns is one of the most beloved ways to celebrate the holiday, but it can be one of the most dangerous. There are easy steps you can take to stay safe and have fun while creating your masterpiece.
If you take some precautions, use the proper tools, plan ahead, and pick your pumpkin wisely, you can save yourself a world of trouble and carve an impressive ghoulish gourd.
Read on for tips on choosing the right pumpkins and 10 steps to crafting the perfect Halloween decoration.
See more:Healthy Comfort Recipes for Any Day
4 TIPS FOR PICKING THE PERFECT PUMPKIN

* Size Matters
When selecting a carving tool, bigger isn't always better. Larger cutting tools like chef's knives give you less control and make it difficult to render detailed designs. They're also more dangerous, since they require substantial force to maneuver. A pumpkin's outer shell is hard, but not so hard that a small cutting implement can't penetrate it.
Small tools, like the miniature saws sold with pumpkin carving kits, are ideal for the job. They are sturdy enough to slice through large pumpkins and ideal for cutting out tiny patterns. Little wood-carving tools also work well. If you have only kitchen knives available, opt for the smallest one, preferably a paring knife.
Your pumpkin doesn't need to be huge either. While larger gourds certainly make a big statement, they also take up more space and require more time to carve as their walls are thicker--not to mention the time and work it takes to scrape out the insides.
* Mess Equals Fun
Once you've got your tools and your canvas, you shouldn't be afraid to get a little dirty. Pumpkin carving is fun but messy. While it's normal to dread the thought of sticking your hand into cold, slimy pumpkin pulp, don't be tempted to reach for rubber gloves, which limit your mobility while cleaning and carving. Because pumpkins are wet inside, the gloves can get slippery, affecting your grip on your cutting tools and the gourd. Instead, keep a clean dish towel or paper towels close by and dry your hands off regularly.
* Plan Ahead
Draw your pattern or design on the pumpkin before you start cutting. Freehand designs can result in very funny and creative jack-o'-lanterns, but if you're going for a polished pumpkin, use a stencil. It will guide the movements of your cutting tools, and you will be less likely to make mistakes. Accidents and errors occur when carvers use more force as they rush through the work. The best way to avoid this is to go slowly and make deliberate cuts in the pumpkin.
However, if you go too far and overcut, or take out a chunk you didn't mean to, you don't have to start over with a new pumpkin. Grab some toothpicks or pushpins and secure the pieces back onto the pumpkin--no one will ever know it wasn't a deliberate decision.
* Carve on the Floor A good way to avoid overcutting is to hold the pumpkin in your lap with your legs crossed and the pattern, or cutting surface, facing up. Placing your pumpkin on a table or other flat surface on its base doesn't secure it in any way, and it will wobble while you're cutting. If you hold it in your lap you will have more control and it won't roll around.
See more:The Scariest Trick-or-Treat Bags
10-STEP CARVING HOW-TO
1. Wash Your Pumpkin
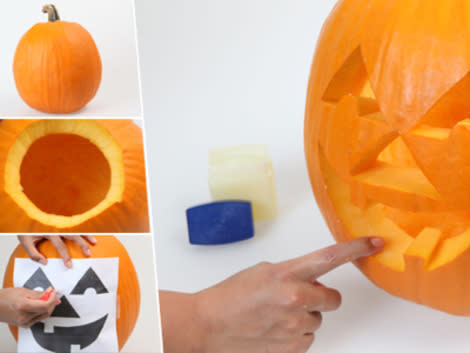
Rinse your pumpkin well and dry it thoroughly.
2. Open It Up Cut a hole around the top stem of the pumpkin. Make sure to make it big enough that your hand can fit in the pumpkin with a few extra inches of space around it. (About 6 to 8 inches in diameter, though this can be larger for bigger pumpkins). Lift the top off and cut the hanging pulp from the underside of the pumpkin top.
3. Grab the Guts Using a scooper from a pumpkin-carving kit or a large round spoon, scoop the pulp out of the pumpkin. Scrape out all the pulp and some of the inside shell. You want the shell to be about 1 inch thick. (Be sure to save those pumpkin seeds to make a roasted treat. Try this Roasted Salted Pumpkin Seed recipe.)
4. Pick Your Design Stencils are great for achieving the look you want for your jack-o'-lantern. You can buy stencils at crafts stores or as part of pumpkin-carving kits (available at department stores and grocery stores ); you can also download them online or draw your own.
5. Start Drawing When your stencil is complete, tape it to the pumpkin. Then, use a toothpick (or another small pointed hand tool) to poke tiny holes through the paper stencil into the pumpkin's surface. Follow along the lines of the design. This will give you a perfect guideline for cutting (and it doesn't leave the leftover ink marks that would result from drawing the design).
6. Carve Carefully Using a small cutting tool, first cut out the smallest parts of the design. Tackling the smallest details first gives you more control. (If large chunks are missing from the pumpkin, its walls won't be as sturdy, and cutting small parts will be difficult.) Then continue on to the medium parts and then cut out the largest pieces.
7. Wash Again When you are done cutting out your design, rinse the jack-o'-lantern a second time--inside and out--and dry it thoroughly. Keeping the pumpkin clean and dry will help it last longer.
8. Light It Up Rather than using a tall candle--which would be visible and distract from your design--place a tea candle inside your jack-o'-lantern in the center of the bottom. The tea candle will emit more than enough light to illuminate your design.
9. Cut a Chimney Once you place the candle inside, keep it lit for about 5 to 10 minutes. (Never leave candles inside your jack-o'-lantern unattended.) When time is up, lift the top off the jack-o'-lantern and check for a dark spot. Cut out the spot and about an inch around it. This will become the "chimney" that will allow the heat from the candle to escape. If you'd rather leave your pumpkins unattended, use battery-powered flameless candles.
10. Preserve the Masterpiece To keep your Halloween handiwork looking (and smelling) good for as long as possible, rub all the cut surfaces with a thin coat of petroleum jelly. This helps keep it from rotting and drying out. Also, if you carved your pumpkin well before the holiday, stick it in the fridge when it's not on display to extend its life.
More fromEpicurious:
Creepy Halloween Crafts for Kids
25 Sandwich Makeovers
Cooking With 5 Ingredients or Less
Tips for Cooking with Fall Inregedients: Pumpkin, Apple, Pear, Cauliflower and more
