Oops! Our Most Common Holiday Cooking Mistakes
Lumpy gravy, pasty potatoes, shredded turkey-what's a holiday cook to do? Find out how to avoid these and other holiday kitchen calamities with Cooking Light magazine's Most Common Cooking Mistakes.
Mistake #1: Your cookies gain unwanted holiday width.
Result: Sad gingerbread men.
Baking holiday cookies can go from a labor of love to an exercise in frustration when your gingerbread men come out more bloated than a Macy's parade float. The problem is too much heat-but not at the baking stage, at the mixing stage: Your butter is too warm.
The solution: Keep your butter cool, right until baking. Butter starts to melt at 68°, and once that happens, its water-fat emulsion breaks and there's no getting it back. Cold, emulsified butter helps give baked goods structure by taking in air when mixed with sugar. For cookies, you want butter well below room temperature; between 50° and 65° is optimal. Cut the butter into chunks, and let it stand at room temperature to soften (nix the microwave idea entirely).
If the butter is still cold to the touch but spreadable, you can start creaming. Butter and sugar need only be mixed (or "creamed") for about 30 seconds-much longer and the butter warms up. Chill the dough for 20 to 30 minutes before you bake. Lastly, don't put the cookies on a hot pan. If you're working in batches, cool the used pan for a few minutes, then run it under cool water before reloading (don't do this while it's hot, though, or you'll risk warping the pan).
Mistake #2:
Your gravy is lumpy.
Result: Lumpy gravy. Next time, whisk wisely. Meanwhile, here's a fix.
One cause is the direct dumping of dry flour, cornstarch, or other thickener into the hot stock or broth. Another: adding broth too quickly into a roux-the flour-fat mixture that some gravy recipes start with-which can cause clumping or a gluey layer on the bottom of the pan. Hot spots in a large pan can complicate things, as well. In any starch-based sauce, the thickener needs to be gradually introduced to the hot liquid it's supposed to thicken. The easiest way, as with our recipe for the Mushroom Gravy, involves whisking a flour slurry into the broth mixture, then stirring until the gravy comes together.
If lumps happen, pass gravy through a sieve or strainer, or puree it (with an immersion blender or, very carefully, in a regular blender). If the gravy originally contained sautéed mushroom slices, well, the guests needn't know that, and it will still be delicious.
See More: How to Make Mushroom Gravy
Mistake #3:
Your mashed potatoes are gluey.
Result: Gluey mashed potatoes. Next time, watch the cooking time and drain well.
Gluey mashed potatoes are more than just unfortunate-they're usually a lost cause. Overcooked or insufficiently drained potatoes can become sticky, as can the wrong kind of potato. But the main problem is overworked spuds. The science is simple: Boiled potatoes develop swollen starch cells. When ruptured during mashing, the cells release starch. The more cells are ruptured, the gummier the mashed potatoes. So if you use an electric mixer or food processor to mash your potatoes, you'll probably beat them mercilessly and end up with wallpaper paste. Instead, use a potato masher, or even better, pass the potatoes through a ricer or food mill before mixing them with butter and hot milk-these devices are gentler on the starch cells, and they'll also prevent lumps.
Low-starch (or waxy) red potatoes hold their shape well after boiling, so they require more effort to mash. Hence, you're likely to overwork them. Try mashing them just partway, as in our Herbed Smashed Potatoes. By contrast, high-starch (mealy or floury) baking potatoes, also called russets, break down more readily, yielding light and fluffy mashed potatoes (or, with a little more milk and butter, smooth and creamy).
See More: Our Best Holiday Sides
Mistake #4: The turkey hack job
Result: Your turkey platter resembles a crime scene.
On turkey day, it's your well-earned right to parade that magnificent roasted bird around the dining room. But carving is best done where there's elbow room and a large, stable cutting surface. You'll need a well-honed knife; have it professionally sharpened before the big day.
Now, as the pros say, "break" the bird down in the right order (this is where many cooks go wrong-trying to slice meat directly off a big, hot bird). Leg quarters come off first, then breast meat, with the tucked-under wings serving to stabilize as you cut. Set the big pieces onto a cutting board where you can deal with them properly.
Take the breast meat off the bone in one piece, then slice crosswise, which ensures uniformity and allows for slightly thicker slices that are juicier and less fibrous than thin portions. Cut the thigh meat into large chunks. Reserve room on the platter for legs if you have a Henry VIII in the family.
Oh, and remember-in the days leading up to Thanksgiving, you can always practice your technique on a nice roasted chicken: same configuration of bird parts, no game-day pressure.
See More: Holiday-Worthy Entrées
Mistake #5: You don't use a meat thermometer.
Result: Your roast chicken, leg of lamb, or beef tenderloin turns out over- or undercooked.
Small and inexpensive, the meat thermometer is one of the most valuable kitchen tools you can own. Using one is the surefire way to achieve a perfect roast chicken or beautiful medium-rare lamb roast, because temperatures don't lie and appearances can deceive.
We love digital probe thermometers, which allow you to set the device to the desired temperature. A heat-proof wire leads to an external digital unit that sits outside the oven and beeps when the meat is ready. This eliminates the frequent opening and closing of the oven door to check the temp―during which you lose valuable heat―and that speeds the cooking.
See More: 100 Easy Chicken Recipes
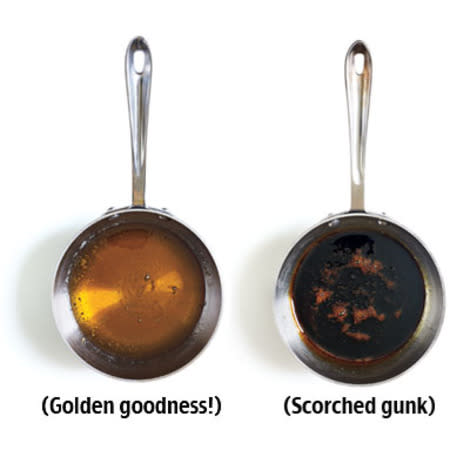
Mistake #6: Your caramel meets a burnt, bitter end
Result: Burnt, bitter caramel. Next time, a little water-and patience-goes a long way.
Caramel is a one-ingredient recipe for experts, two for more cautious cooks who add water to the sugar-but either way it can quickly turn into a chemistry experiment gone wrong. The problem is a rapid acceleration of browning, which can quickly move your sugar sauce into bitter, burnt territory.
Sugar behaves differently from other foods when it's cooked. While most ingredients absorb heat from the pan, sugar actually generates its own heat as it breaks down. This causes the temperature to rise fast-about one degree per second. When you remove the pan from the heat as the caramel reaches the perfect light-amber hue, it can still burn because residual heat from the pan keeps the action going.
The key is watchful, hands-off cooking, as slow and even as possible. Adding ¼ cup of water per cup of sugar dissolves the sugar uniformly and slows boiling, providing more control as you look for that honey-gold color. Use a light-colored stainless steel or enamel saucepan and a candy thermometer.
To make the caramel, cook the sugar and water, without stirring (or absolutely minimal stirring, if you must), over medium-low heat until golden and fragrant, about 335°. With experience, you'll learn to trust color more than temperature.
The hands-off approach works best because stirring can cause hot caramel to crystallize when it hits the cool sides of the pan, and that can set off a chain reaction that ruins the sauce.
Set the pan in an ice bath for two to three seconds to stop the cooking (any longer and the caramel will seize), then use immediately.
Continue Reading: The Most Common Cooking Mistakes
Don't Miss:
101 Healthy Soup Recipes
Meatless Holiday Dishes
21 Slow-Cooker Favorites
