User post: Roast a Thanksgiving Turkey They're Sure to Gobble Up
Every year I think I will try something fancy with my Thanksgiving turkey -- perhaps brining it, or cooking a turducken or maybe even frying it in peanut oil -- and every year I make my turkey the exact same way. Why? Because it always turns out perfectly and it tastes so darned good. For anyone interested in a juicy, tasty, simple-to-cook turkey, I'll share my big secrets.
My turkey cooking days began my first Thanksgiving away from home when my mother sent me a sage, yet humorous email, with instructions. I printed that email out and pulled it out year after year and managed to keep it despite moving cross-country twice since then. I've also picked up a few tricks of my own along the way and have written them in the margins over several years, and one day finally got smart and typed everything up so I wouldn't lose those precious notes.
TurkeyPrep (notes written for myself and future generations)
We buy a local brand of turkey, Shady Brook Farm, rather than a national brand, and I think it makes a difference. But my second choice would be a Butterball. I prefer fresh to frozen. If you have to buy frozen, remember to give it several days to thaw in the fridge. If it is still not thawed, you will have to let it thawed in a bucket or sink filled with cold water and make sure the turkey is fully submerged.
I also prefer a covered roasting pan (you'll need a really, really big one if you follow my tradition of cooking 20+ pound birds).
Ready… this is the part my husband and I always forget. BEFORE YOU PREHEAT THE OVEN… remove the second rack and make sure to put the remaining one at the lowest level. Should you forget to do this, say every year for 10 straight years, you can always put the rack out in the cold on the deck.
Oh yeah, now is a good time to make sure that your roasting pan is on the counter, ready for the big bird. Not, say, down in the basement.
Preheat your oven to 500 degrees. Nope, not a typo, you are going to cook it for 30 minutes at 500 degrees to give the bird a beautiful tan and seal the juices in. It takes a while to get up that high, so turn that oven on now.
Always check the neck and chest cavities for a plastic bag with the gizzards and liver, and also for the neck itself.
Rinse the turkey inside and out with cold water and put it in your rack. Make sure you rinse out the sink and anything else you may have touched (faucet handles, etc.) and Clorox them as well afterward.
Stuff the turkey (some of my relatives are anti-stuffed turkey - they don't realize that the turkey is merely a gigantic cooking/flavoring hole for the stuffing, why else would I cook a turkey?) You need to not pack the stuffing very tightly, it needs to go in loosely. I make sort of small loose balls to put it in. Don't forget you can put stuffing in the neck cavity as well. You will remove the stuffing before carving the turkey - do not let stuffing sit in the turkey after it has been cooked! And remember, your stuffed turkey will take longer to cook than a non-stuffed turkey.
Oh, and I leave the "pope's nose" (fatty bit just under the chest cavity) on the turkey, some people cut it off. It adds good flavoring to the drippings.
After you've stuffed the turkey, rub some poultry seasoning all over the skin - everywhere. Then rub softened butter all over the skin (I find it easier to do the poultry seasoning first, then the butter). I tend to put a few bits of butter on the top of the exposed stuffing as well.
Pour some water (about 1/2 cup) into the bottom of the pan. Don't worry about any stuffing or butter that has dropped into the pan.
Put tin foil over the wing tips and ends of the drumsticks to protect them from burning.
Into the Oven
Put the bird in the oven with no lid for 30 minutes at 500 degrees. I put about half a stick of butter into a bowl and put that on top of the middle part of the stove so it softens during that 30 minutes of time. When the time goes off, baste with the melted butter and also the pan drippings, then put the cover on, turn down the temperature to 350 degrees, and set timer for another 30 minutes, repeat butter softening trick. I baste every 30 minutes to 1 hour (depending on how frantic the other food prep is).
Do not rely on the "pop-up" device in the turkey to tell you when the turkey is done. Use a thermometer. Or if your mother-in-law accidentally melted your thermometer, you will know your turkey is done when the legs move freely at the joint and the juices run clear. When using the roaster, my turkey usually cooks about an hour faster than the timetable says it should. Make sure you check both the turkey itself and the stuffing when you use a thermometer.
Because you have browned and sealed the turkey at the beginning of the cooking, you will not have to worry about removing the lid/tin foil at the end of the process to get that golden color, so if you are looking at other cooking instructions, ignore that part.
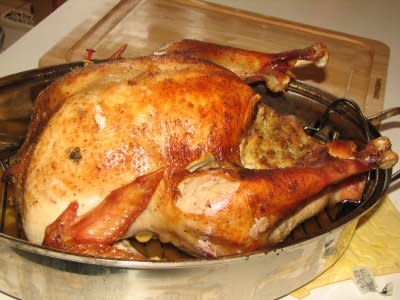
The turkey carves better after it has been allowed to "rest" - I usually take the pictures when it is right out of the oven, then I have my husband make one cut at the breast to ensure the turkey is cooked through. Then I put the lid back on and let it rest and stay warm while we put the casseroles in the oven.
Remember to remove that stuffing from both cavities!
Enjoy!
Proceed to call everyone in your family and ask, "How big is your turkey?" and "What are you serving?" Or is that just my family?
When she's not slaving away in the hot kitchen for Thanksgiving, J.J. Newby blogs as JavaMom at Caffeine and a Prayer.
